
GST Registration Procedure: Step-by-Step Guide
Sourav Banik
Author

Latest Updates and Notifications
Before we move on to the detailed GST registration procedure, here are some of the latest updates that you need to be aware of. The Goods and Services Tax (GST) has been a historical part of the Indian economy for the last 9 years. The government has been constantly updating the GST regime to facilitate MSMEs and consumers, so here are some of the latest updates that you may need to note down now:
ISD System Introduction
The Government of India has mandated the introduction of an Input Service Distributor (ISD), effective from April 1, 2025. The reason for introducing this system is to implement a fair tax distribution system within Indian businesses.
Biometric Authentication System Mandate
The biometric-based authentication system for GST has been now expanded to the entire India, which was earlier limited only to Gujarat and Puducherry. Without biometric-based authentication, a business is not eligible for GST registration.
GST Amnesty Scheme Date Extended
The date for applying for the GST Amnesty Scheme is extended to June 30, 2025. The maximum deadline to pay the entire tax under this scheme is March 31, 2025.
Availability of GST Form SPL 02 in GST Portal
The GST Form SPL 02 is now accessible to be downloaded and filed from the official GST portal. This form waives off all penalties and interest under Section 128(1)(b) & Section 128(1)(c)
Documents to be Submitted for GST Registration
The documents required for GST registration vary from business to business. The document requirement depends on the nature of the business, the nature of the taxpayer, whether the taxpayer is normal or suo moto and a few more. Here are some general documents that are needed to be submitted for all types of businesses:
- Business PAN Card and Aadhaar Card for verification purposes
- Constitution documents such as a Certificate of Incorporation for verification of the business incorporation details or a partnership deed
- Consent letter, electricity bill, rental agreement or property tax receipt for verification of the business address
- Bank Account Details: Your bank account details, such as the account number, IFSC code, and bank name, will be needed for tax payment and refund
- Photograph of stakeholders in case the business is a limited liability partnership
- Rental receipt with NOC in case the business is a public limited company
- Authorization letter if the GST registration is done by a stakeholder other than the business owner If you need to properly understand a complete list of all the documents that are required for GST registration, you can visit the official site of GST. Here you can check under Help and Taxpayer Facilities to find the full list of documents. Moreover, this list of GST registration documents above will help you quickly arrange for all the documents that you have to compulsorily submit.
Calculate how much GST your business has to pay by Covrzy GST Calculator online.
GST Registration Procedure: Step-by-Step Guide

The GST registration steps are a multi-step procedure. It may seem complex at first, but we have simplified the process for your ease of access. Following these steps carefully is crucial for a successful registration. But before we start, note that the registration process is divided into two different parts - Part A and Part B. Here are the steps for each part.
GST Registration Procedure For Part A
Let’s quickly check out the main outlines for GST registration - Part A
Step 1: Visit the GST Portal
Start by first visiting the official GST portal. Beware of multiple fraudulent websites or intermediaries that promise quick registration. Also, check for the connection security of the website that you are visiting. If not sure, you can also reach out to the official helpline number at 1800-103-4786.
Step 2: Fill in the Application Form
The next step is to check the Help and Taxpayers Facilities section on the website. This section will give you direct access to register and file for GST without undergoing any redirects or delays. Choose the New Registration page here. Select the Taxpayer type, and then choose your state/district. You then need to enter other details such as your business name, business PAN number, email address, and mobile number and check the CAPTCHA for GST registration online.
Step 3: OTP Verification
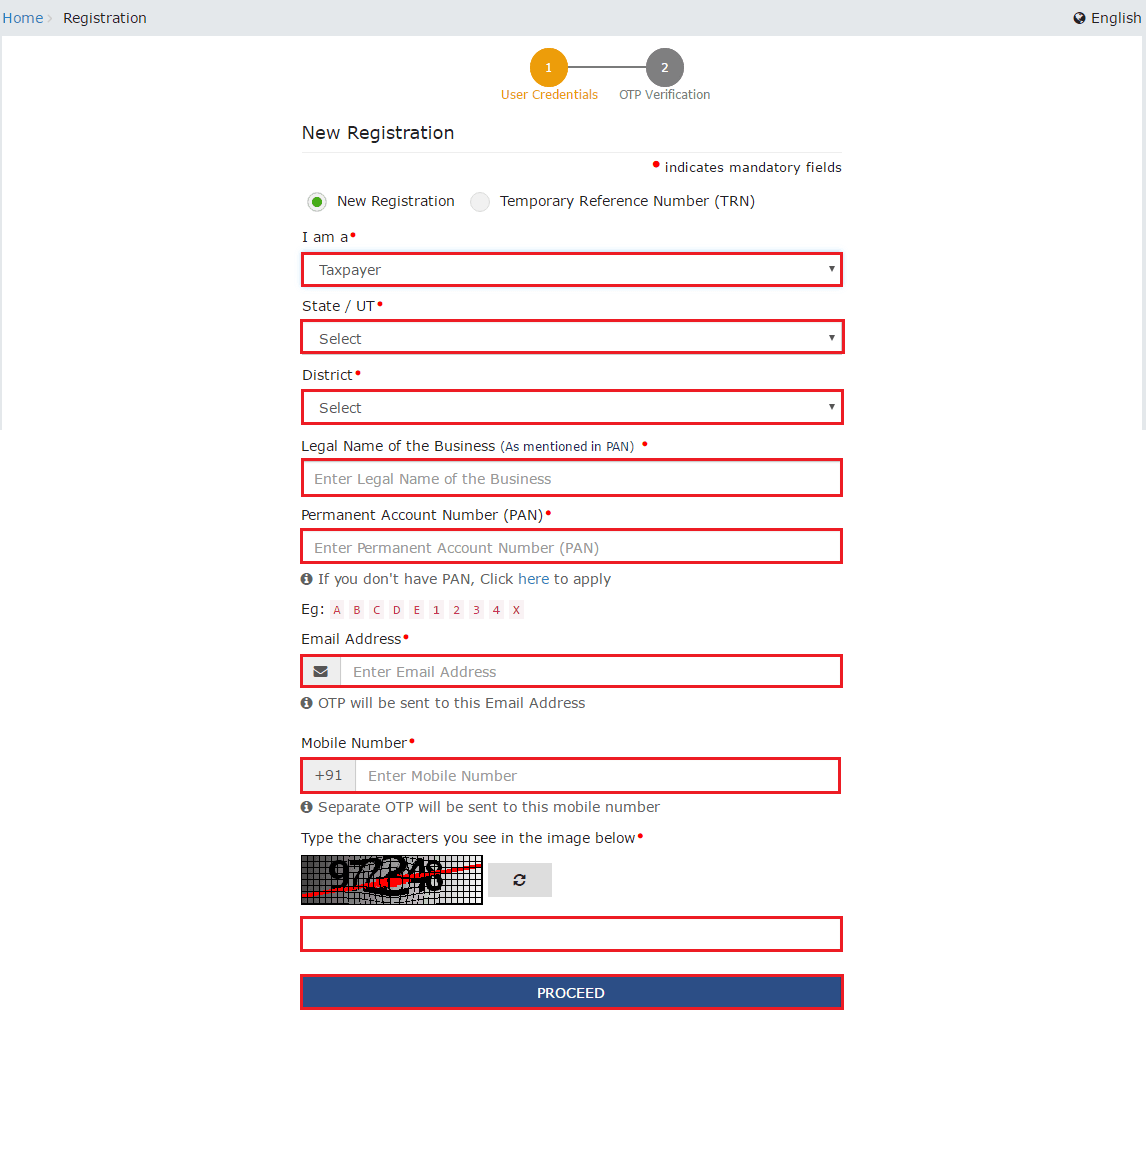
The next step is a continuation of Step 2. After entering your business mobile number and email address, you will receive an OTP in each of these. You need to enter the OTP within 10 minutes for verification. After successful entry, you will receive a Temporary Reference Number (TRN) acknowledgement in your business email.
GST Registration Procedure For Part B
From here, Part B of the registration process starts. This is the final part, the completion of which will register your business. Check out the GST registration step-by-step for the final part.
Step 4: Enter TRN
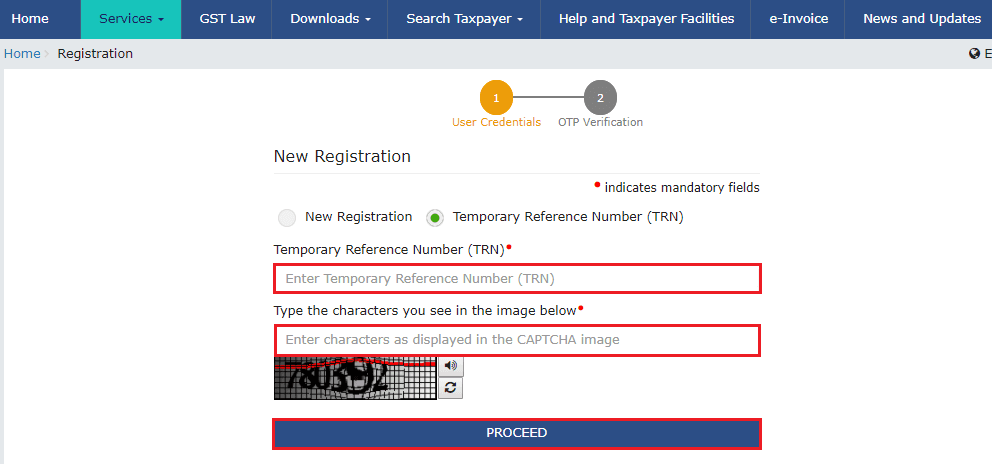
In this step, enter the TRN number and you will again receive OTPs on both the mobile number and email address of your business. Re-enter these details to proceed further.
Step 5: Access Saved Application Form
You will be redirected to the My Saved Application Page. There click the Action icon, and you will get to view the registration application form. A range of tabs displaying Business Details, Promoter/ Partners, Authorized Signatory, Authorized Representative, Principal Place of Business and a few more will be instantly shown to you.
Step 6: Check Business Details
A vital step in the procedure for registration under GST is filling up the business details. In this tab, you need to enter all these business details:
- Your business's legal name
- Type of constitution
- Business district
- Category of business owner (select if you are a manufacturer or a supplier)
- Reason for obtaining registration (here just select Input Service Distributor only option)
- Date of commencing your business
- Date of liability registration
- Document for trade name You can also check the GST registration status by checking whether you have received a blue tick as confirmation.
Step 7: Check Promoter/ Partners
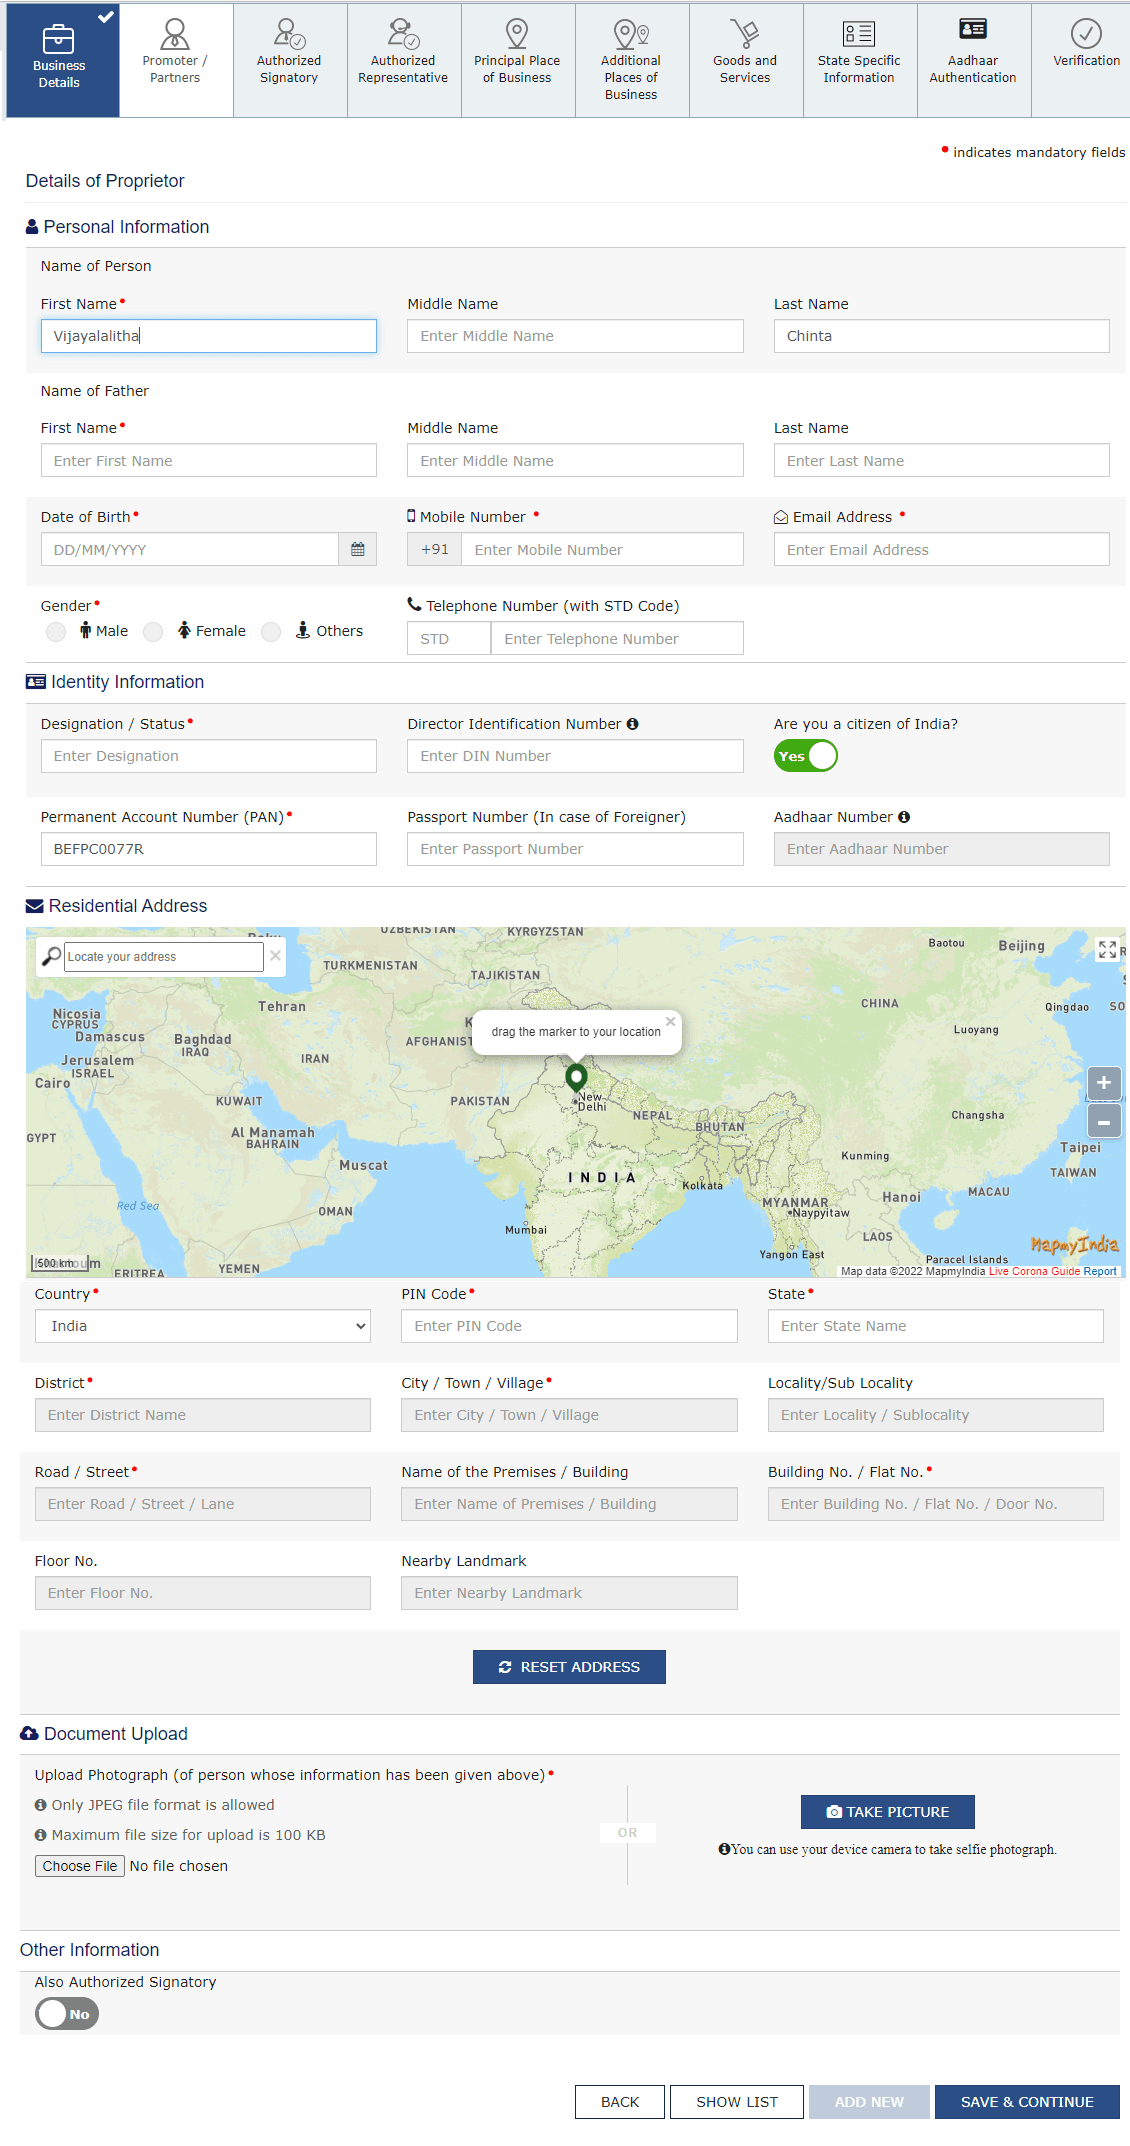
In GST registration online, you have to enter the details of the business owner/proprietor and business partners. You need to enter the details as:
- Business owner name
- Business partner name
- Director Identification Number (DIN)
- Mobile number of business owner
- Email address of business owner
- PAN Number
- Gender
- Identity information
- Business owner's residential address
- A photograph of a business owner
Step 8: Authorized Signatory
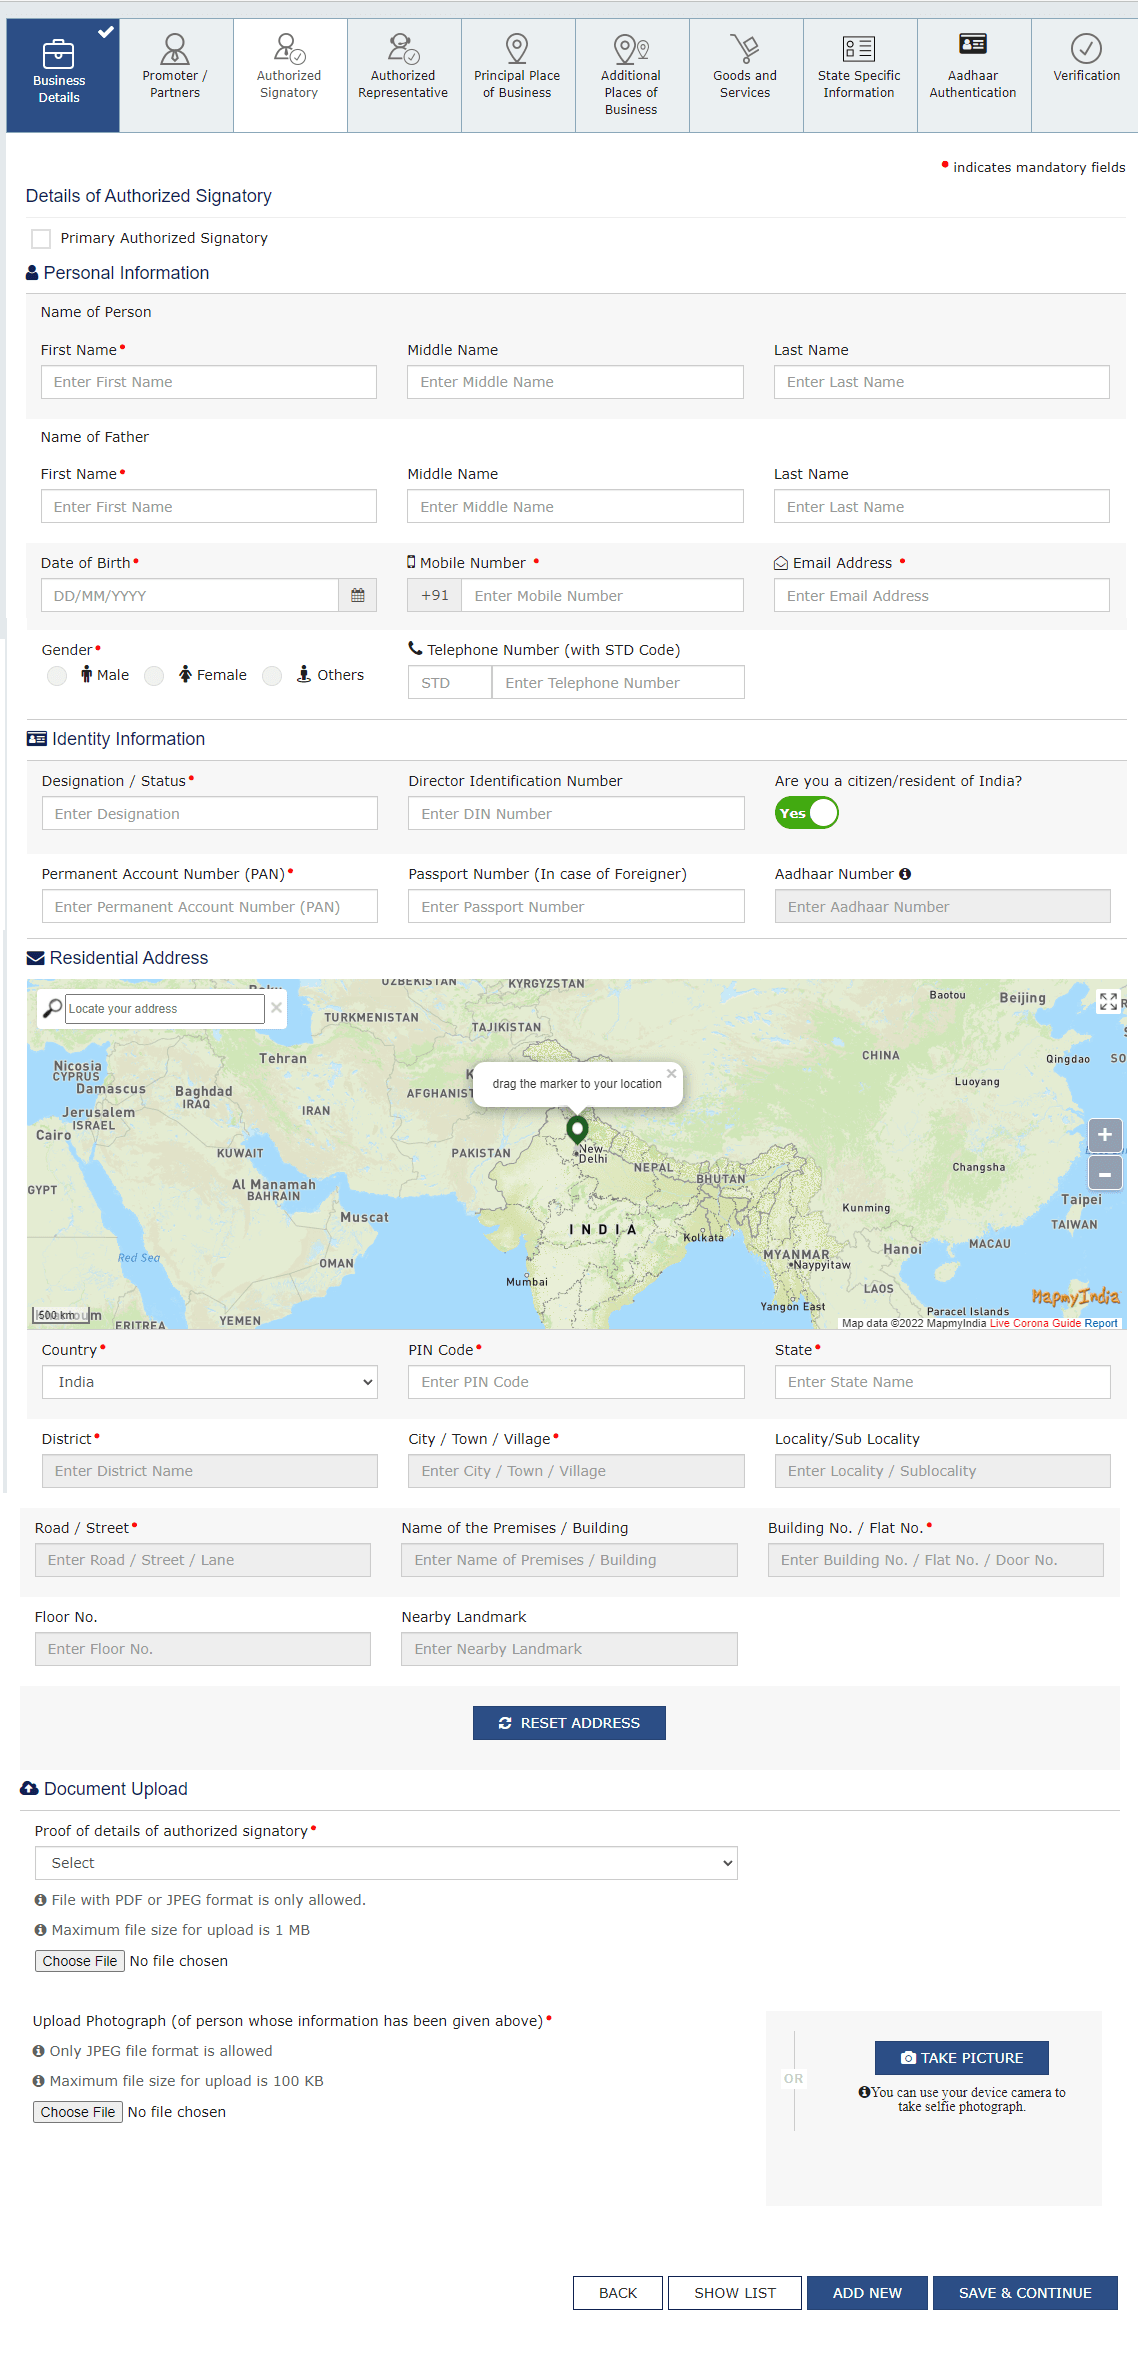
This is the specific tab for authorized signatories only, where you have to enter the personal details of the signatory. An authorized signatory is the person liable for signing all contracts, responsible for financial management and duly complying with regulations. This comprises of:
- Name
- Contact Information
- Director Identification Number
- Designation
- PAN number
- Aadhar Number
- Residential address
Step 9: Authorized Representative
In the case of having an authorized representative, you have to select the type of the representative present. It can be either a GST practitioner or a non-GST practitioner. You need to enter their:
- Full name
- Designation
- Mobile number
- Email address
- PAN
- Aadhar Number
Read the main advantages and disadvantages of GST, and also know the various types of GST.
Step 10: Principal Place of Business
The principal place of business refers to the primary place where the business is operated and tax is being paid. You have to fill up these details for a successful GST registration process:
- PIN Code:
- State/Town/Village name:
- Locality:
- Building name:
- Building number:
- Landmark:
- District:
- Road name:
- Center Jurisdiction:
- Proof of business place:
- Nature of business:
- Nature of holding (rent/lease/owned):
Step 11: Additional Places of Business
These are the additional places where your business is registered, you will have to enter these manually. The information which you have to enter is the same as the details of the principal place of business tab.
Step 12: Goods and Services
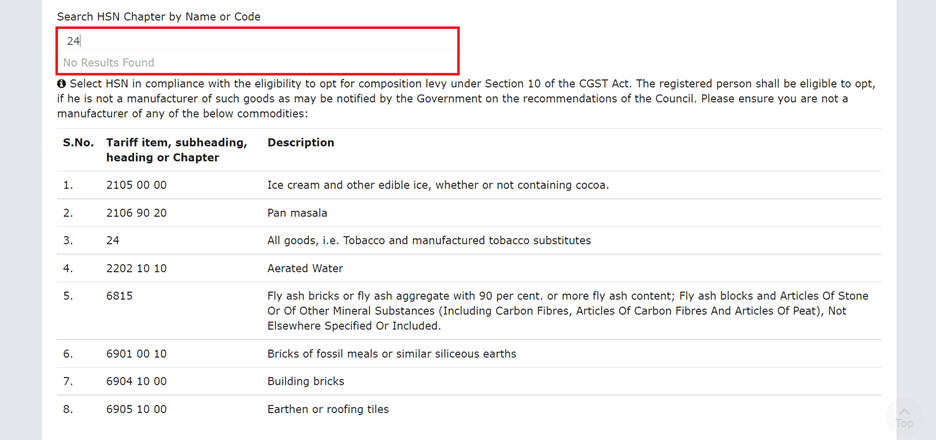
One of the most important sections in the GST registration procedure is carefully selecting the goods and services that your business supplies. There are two different ways of doing this.
- You can select the products that you sell by mentioning the HSN Code
- If you don’t know the HSN Code, you may type the name of your product The next step is to enter the Service Classification Code. If you are aware of the code, then enter the first four digits. If you are not aware, then simply type the name of the service.
Step 13: State-Specific Information
Here you have to enter the specific details such as:
- State Electricity Board name
- CA Number
- Professional Tax Employee Code
- Professional Tax Registration Certificate Number
- State Excise License Number
- Excise License Registration personnel
Step 14: Aadhaar Authentication
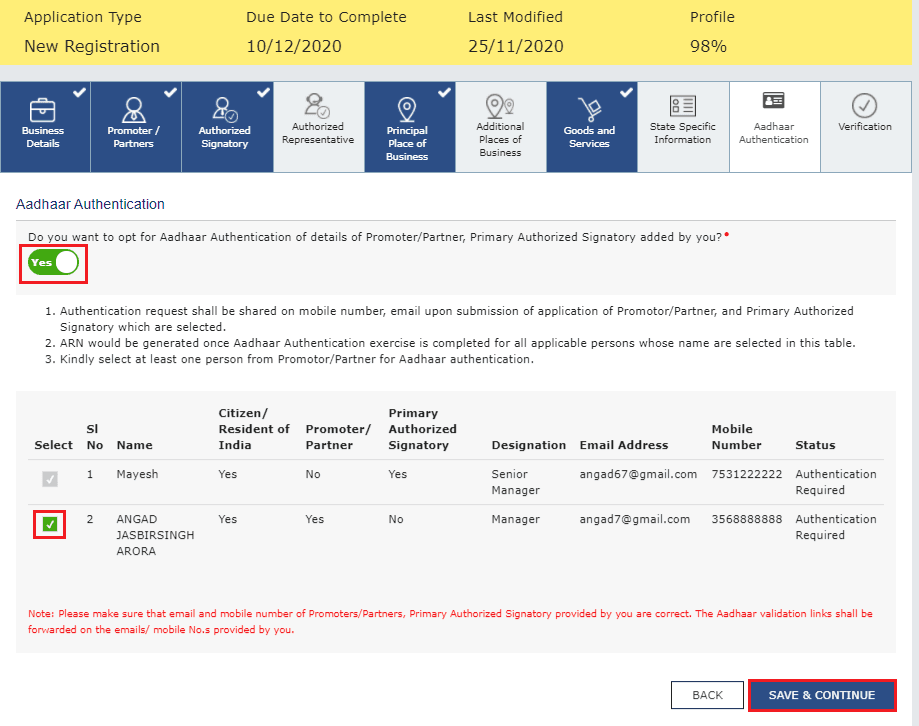
Enter the Aadhar details for identity verification. Unless you correctly enter the Aadhar number, you may have to restart the process. During Aadhar verification, you have to select the name of the proprietor or partner of the company.
Step 15: Final Verification
This is the final tab to fill in. Click the verification checkbox, and select the name of the authorized signatory. If your company is a limited liability or a public limited, you have to share a digital signature. Also, enter the place of sign based on the location where you are signing the form. In case the details provided by you do not match with the UIDAI database, then you will be prompted and notified via a new email and SMS. After the successful entry of your Aadhar details, you will receive a verification link, which is valid for 15 days. In case you do not receive the link, you can repeat the process for sharing a new link.
How to Check GST Registration Status?

You can verify the status of your GST registration by directly accessing the GST application tracking portal. Follow these steps: Visit the official GST portal and click the “Services” section. You will get an option for tracking your application. You may do this in two ways:
Check With The ARN Number
Application Reference Number (ARN) is the specific number assigned to you when you apply online for GST registration. You can track your application by simply entering the ARN.
Checking With SRN/FRN Number
You can track your application status also in case you do not have an ARN. This is possible by entering your SRN/FRN number which you receive upon GST registration.
Common Mistakes to Avoid While GST Registration
There are a few common mistakes that you can still make during the GST registration process. Review these errors to avoid when you sign up for a first-time registration: Inaccurate information: Always check for the business details and details of the proprietor before you submit the form online. These details once submitted are difficult to change.
- Incomplete documentation: Ensure that you are submitting scanned copies of all the required documents. You can visit the GST portal and make a checklist for all the documents needed.
- Typing the wrong HSN Code: This needs to be watched carefully. Typing a wrong HSN Code can enter a completely wrong GST product or service, which will charge you a wrong GST.
- Using unofficial websites: Only use the official GST portal for correct submission. There are multiple fraudulent websites that pose as GST portals, try to beware of such websites.
Conclusion
The GST registration procedure is a crucial one for most businesses operating in India. Complying with GST not only counts your business to be ethical but also makes your business a responsible entity. By using this step-by-step guide, you will be able to register for the GST of your company successfully. The best way to remain updated is to keep visiting government websites or simply stay in touch with Covrzy to get the latest updates. For startups and SMEs, being updated is vital as they may have to pay higher penalties if they miss out on these updates.
Insure Your Directors and Officers Today With D&O Liability Insurance
The Directors and Officers are the decision-makers in your company, they strategize, decide and are accountable for all commercial activities. Imagine losing millions after being stuck in a legal battle for any lawsuits filed against the company director, which also risks the brand's reputation immensely. A Directors and Officers Liability Insurance (D&O Insurance) with Covrzy can act as a quick solution to major risks such as failure in corporate governance and also financially shields your business in such cases.
Frequently Asked Questions
Explore moreWho is eligible to register for GST?
If the annual turnover of your business exceeds ₹40 lakhs per annum, you have to mandatorily register for GST. If your business belongs to a few specific states such as Mizoram, Arunachal Pradesh, Himachal Pradesh, Sikkim, or Uttarakhand, you have to register for GST if your business exceeds ₹20 lakhs turnover.
How much turnover is needed for GST registration?
For GST registration online, your business turnover needs to exceed ₹40 lakhs per annum.
How much to pay for GST registration?
You can register for GST online for free, as the GST Council has not mentioned any fees to be charged for GST registration. You may have to pay a higher fee if you complete GST registration steps by a GST filing firm, or any Chartered Accountant.
What if my GST registration application is refused?
If your application is refused, the GST portal will normally notify you of the main reasons for refusal. Try to resolve the issues and re-apply for registration.
What is MMI in GST registration?
MMI refers to Map My India, an inbuilt map location feature in the online GST registration procedure. You can point and mark your exact location by using this feature.
How long does the GST registration process take?
The GST registration procedure typically takes 7 working days. However, factors such as incorrect entry of details and insufficient documentation can affect the process.
How much time does it take for the Biometric Aadhar Authentication for GST registration?
It usually takes a total of 15 days to complete this authentication process. The 15 days are counted from the date of Part B submission. In case of failure of submission, 15 days is counted again from the date of resubmission.
Which information I cannot change once submitted in GST registration?
PAN information, Constitution of Business submitted if PAN information is entered incorrectly and State name cannot be changed once they are submitted.
What if I make an error on my application?
In case you have made an error in your application, it is best to visit the official GST portal and select the option “Amendment of Registration Core Fields”. You will get most of the details editable, except that you cannot have PAN details and State names.
Can I seek assistance with my GST registration?
Yes, you can hire professionals or chartered accountants for help. They can assist you in the process and prevent typical errors. This is helpful for startups and SMEs who may not have an in-house GST expert.
Do you have more questions?
Contact us for any queries related to business insurance, coverages, plans and policies. Our insurance experts will assist you.
